Updated: 12-Dec-2024
Sources: 1 https://pve.proxmox.com/wiki/Resize_disks, 2 https://packetpushers.net/blog/ubuntu-extend-your-default-lvm-space/
I’m writing this down because I do this about every six months and spend a day looking it up and breaking stuff every time. I use LVM and ext4 file system in my VMs.
Expansion Process
If I enlarge or resize the hard disk in PVE, my partition table and file system INSIDE the VM knows nothing about the new size, so I have to act inside the VM to fix it.
Shrinking disks is not supported by the PVE API and has to be done manually.
1. Resizing guest disk
qm command (or use the resize command in the GUI)
You can resize my disks online or offline with command line:
qm resize <vmid> <disk> <size>
example: to add 5G to my virtio0 disk on vmid100:
qm resize 101 virtio0 +30G
For virtio disks, Linux should see the new size online without reboot with kernel >= 3.6
2. Enlarge the partition(s) in the virtual disk
We will assume I am using LVM on the storage and the VM OS is using ext4 filesystem.
Online for Linux Guests
Here we will enlarge a LVM PV partition, but the procedure is the same for every kind of partitions. Note that the partition I want to enlarge should be at the end of the disk. If I want to enlarge a partition which is anywhere on the disk, use the offline method.
Check that the kernel has detected the change of the hard drive size. In this excample (here we use VirtIO so the hard drive is named vda)
❯ sudo dmesg | grep vda
[    0.413554] virtio_blk virtio2: [vda] 140509184 512-byte logical blocks (71.9 GB/67.0 GiB)
[    0.423954]  vda: vda1 vda2 vda3
[    2.997437] EXT4-fs (vda2): mounted filesystem 9341d9b9-94d2-46c4-a3e1-53bcd19e6a22 r/w with ordered data mode. Quota mode: none.
[1682633.068612] virtio_blk virtio2: [vda] new size: 203423744 512-byte logical blocks (104 GB/97.0 GiB)
[1682633.068630] vda: detected capacity change from 140509184 to 203423744
Example with EFI
Print the current partition table
❯ sudo fdisk -l /dev/vda | grep ^/dev
GPT PMBR size mismatch (140509183 != 203423743) will be corrected by write.
The backup GPT table is not on the end of the device.
/dev/vda1     2048      4095      2048   1M BIOS boot
/dev/vda2     4096   2101247   2097152   1G Linux filesystem
/dev/vda3  2101248 140509150 138407903  66G Linux filesystem
Resize the partition 3 (LVM PV) to occupy the whole remaining space of the hard drive). Notice the third part grows from the first parted print to the second.
❯ sudo parted /dev/vda
GNU Parted 3.6
Using /dev/vda
Welcome to GNU Parted! Type 'help' to view a list of commands.
(parted) print
Warning: Not all of the space available to /dev/vda appears to be used, you can fix the GPT to use all of the space (an
extra 62914560 blocks) or continue with the current setting?
Fix/Ignore? F
Model: Virtio Block Device (virtblk)
Disk /dev/vda: 104GB
Sector size (logical/physical): 512B/512B
Partition Table: gpt
Disk Flags:

Number  Start   End     Size    File system  Name  Flags
 1      1049kB  2097kB  1049kB                     bios_grub
 2      2097kB  1076MB  1074MB  ext4
 3      1076MB  71.9GB  70.9GB

(parted) resizepart 3 100%
(parted) quit
Information: You may need to update /etc/fstab.

❯ sudo parted /dev/vda
GNU Parted 3.6
Using /dev/vda
Welcome to GNU Parted! Type 'help' to view a list of commands.
(parted) print
Model: Virtio Block Device (virtblk)
Disk /dev/vda: 104GB
Sector size (logical/physical): 512B/512B
Partition Table: gpt
Disk Flags:

Number  Start   End     Size    File system  Name  Flags
 1      1049kB  2097kB  1049kB                     bios_grub
 2      2097kB  1076MB  1074MB  ext4
 3      1076MB  104GB   103GB
Example without EFI
Example from another VM without EFI using parted:
parted /dev/vda
(parted) print
Number  Start   End     Size    Type      File system  Flags
1       1049kB  538MB   537MB   primary   fat32        boot
2       539MB   21.5GB  20.9GB  extended
3       539MB   21.5GB  20.9GB  logical                lvm
Resize the 2nd partition, first (extended):
(parted) resizepart 2 100%
(parted) resizepart 3 100%
Check the new partition table
(parted) print
Number  Start   End     Size    Type      File system  Flags
1       1049kB  538MB   537MB   primary   fat32        boot
2       539MB   26.8GB  26.3GB  extended
3       539MB   26.8GB  26.3GB  logical                lvm
(parted) quit
3. Enlarge the filesystem(s) in the partitions on the virtual disk
If I did not resize the filesystem in step 2
Online for Linux guests with LVM
Enlarge the physical volume to occupy the whole available space in the partition:
pvresize /dev/vda3
List logical volumes:
lvdisplay
 --- Logical volume ---
 LV Path                /dev/{volume group name}/root
 LV Name                root
 VG Name                {volume group name}
 LV UUID                DXSq3l-Rufb-...
 LV Write Access        read/write
 LV Creation host, time ...
 LV Status              available
 # open                 1
 LV Size                <19.50 GiB
 Current LE             4991
 Segments               1
 Allocation             inherit
 Read ahead sectors     auto
 - currently set to     256
 Block device           253:0
I’ve noted that in Ubuntu Server the Volume Group Name does not end in root as Ubuntu Desktop does.
Here is Ubuntu Server
--- Logical volume ---
  LV Path                /dev/ubuntu-vg/ubuntu-lv
  LV Name                ubuntu-lv
  VG Name                ubuntu-vg
  LV UUID                DoMD3y-0lmV-osy5-mwOj-hMs9-ruaV-S8ufTu
  LV Write Access        read/write
  LV Creation host, time ubuntu-server, 2022-01-24 21:59:57 +0000
  LV Status              available
  # open                 1
  LV Size                <66.00 GiB
  Current LE             16895
  Segments               1
  Allocation             inherit
  Read ahead sectors     auto
  - currently set to     256
  Block device           253:0
and here is Ubuntu Desktop (Ubuntu Mate)
 --- Logical volume ---
  LV Path                /dev/vgubuntu-mate/root
  LV Name                root
  VG Name                vgubuntu-mate
  LV UUID                Z270jO-SCGC-cttK-Vtac-m2gF-zILg-dPA9xO
  LV Write Access        read/write
  LV Creation host, time ubuntu-mate, 2023-11-19 18:59:16 -0500
  LV Status              available
  # open                 1
  LV Size                <55.77 GiB
  Current LE             14276
  Segments               1
  Allocation             inherit
  Read ahead sectors     auto
  - currently set to     256
  Block device           252:0
Enlarge the logical volume and the filesystem (the file system can be mounted, works with ext4 and xfs). Replace “{volume group name}” with my specific volume group name:
This command will increase the partition up by 20GB
lvresize --size +20G --resizefs /dev/{volume group name}/root
Use all the remaining space on the volume group, in this case in server:
sudo lvresize --extents +100%FREE --resizefs /dev/ubuntu-vg/ubuntu-lv
Here it is in action:
sudo lvresize --extents +100%FREE --resizefs /dev/ubuntu-vg/ubuntu-lv
  Size of logical volume ubuntu-vg/ubuntu-lv changed from <66.00 GiB (16895 extents) to <96.00 GiB (24575 extents).
  Logical volume ubuntu-vg/ubuntu-lv successfully resized.
resize2fs 1.47.0 (5-Feb-2023)
Filesystem at /dev/mapper/ubuntu--vg-ubuntu--lv is mounted on /; on-line resizing required
old_desc_blocks = 9, new_desc_blocks = 12
The filesystem on /dev/mapper/ubuntu--vg-ubuntu--lv is now 25164800 (4k) blocks long.
resize2fs /mount/device size
resize2fs /dev/vda1
From the second article
For just Ubuntu/Debian and assumes there is free space in the partition
See the second link above. The default Ubuntu installer settings may not use my entire root partition available to it. So I may use these commands to expand the usable space to grab up all the free space that may be left in the partition.
A. Start by checking my root filesystem free space with df -h
Here I am using 32% or 20GB/65GB of the file System
 jcz@lamp:~$ df -h
Filesystem                         Size  Used Avail Use% Mounted on
tmpfs                              383M  1.7M  381M   1% /run
/dev/mapper/ubuntu--vg-ubuntu--lv   65G   20G   43G  32% /
tmpfs                              1.9G     0  1.9G   0% /dev/shm
tmpfs                              5.0M     0  5.0M   0% /run/lock
/dev/vda2                          974M  182M  725M  21% /boot
tmpfs                              382M   12K  382M   1% /run/user/1000
B. Check for existing free space on my Volume Group, run the command vgdisplay and check for free space. Here I can see I have 16.00 GiB of free space (Free PE) ready to be used. If I don’t have any free space, move on to the next section to use some free space from an extended physical (or virtual) disk.
root@pbs:~# vgdisplay
  --- Volume group ---
  VG Name               pbs
  System ID
  Format                lvm2
  Metadata Areas        1
  Metadata Sequence No  3
  VG Access             read/write
  VG Status             resizable
  MAX LV                0
  Cur LV                2
  Open LV               2
  Max PV                0
  Cur PV                1
  Act PV                1
  VG Size               <199.00 GiB
  PE Size               4.00 MiB
  Total PE              50943
  Alloc PE / Size       46847 / <183.00 GiB
  Free  PE / Size       4096 / 16.00 GiB  <---
  VG UUID               pUCnBq-dYv7-wN3m-NTvy-XFwD-YT2e-UOku16
C. Use up any free space on my Volume Group (VG) for my root Logical Volume (LV), first run the lvdisplay command and check the Logical Volume (LV) size, then run lvextend -l +100%FREE /dev/ubuntu-vg/ubuntu-lv to extend the LV (from the LV Path) to the maximum size usable, then run lvdisplay one more time to make sure it changed.
root@pbs:~# lvdisplay

  --- Logical volume ---
  LV Path                /dev/pbs/root
  LV Name                root
  VG Name                pbs
  LV UUID                80mBRo-cMoc-OIST-hn7j-ootY-dH8E-TghShK
  LV Write Access        read/write
  LV Creation host, time proxmox, 2024-11-17 16:05:04 -0500
  LV Status              available
  # open                 1
  LV Size                <179.00 GiB   <---
  Current LE             45823
  Segments               1
  Allocation             inherit
  Read ahead sectors     auto
  - currently set to     256
  Block device           252:1
Let’s use up the remaining free space
root@pbs:~# lvdisplay
root@pbs:~# lvextend -l +100%FREE /dev/pbs/root
  Size of logical volume pbs/root changed from <179.00 GiB (45823 extents) to <195.00 GiB (49919 extents).
  Logical volume pbs/root successfully resized.
That seemed to work. Let’s check it to verify.
  root@pbs:~# lvdisplay
    --- Logical volume ---
  LV Path                /dev/pbs/root
  LV Name                root
  VG Name                pbs
  LV UUID                80mBRo-cMoc-OIST-hn7j-ootY-dH8E-TghShK
  LV Write Access        read/write
  LV Creation host, time proxmox, 2024-11-17 16:05:04 -0500
  LV Status              available
  # open                 1
  LV Size                <195.00 GiB
  Current LE             49919
  Segments               1
  Allocation             inherit
  Read ahead sectors     auto
  - currently set to     256
  Block device           252:1
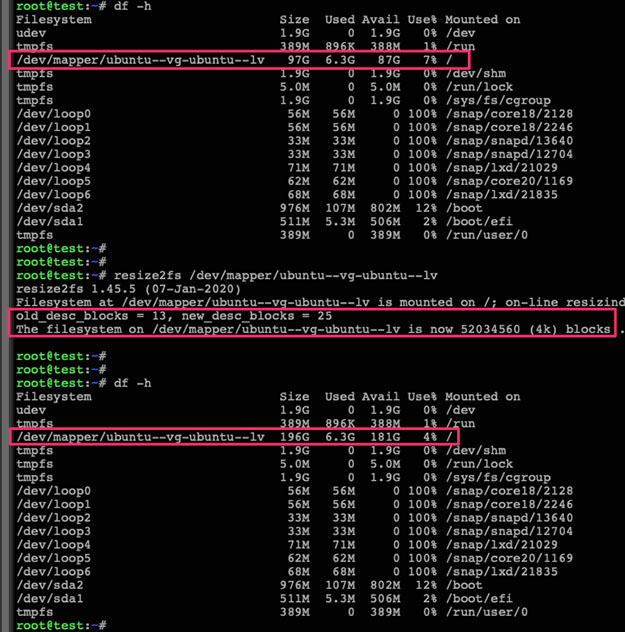
D. Now I have increased the size of the block volume where the root filesystem resides, but I still need to extend the filesystem on top of it. First, I will run df -h to verify my (almost full) root file system, then I will run resize2fs /dev/mapper/pbs-root to extend my filesystem, and run df -h one more time to make sure I’m successful. of course I’m using Debian here as installed on a test instance of Proxmox Backup Server that I’m going to blow away.
root@pbs:~# df -h
Filesystem            Size  Used Avail Use% Mounted on
udev                  1.9G     0  1.9G   0% /dev
tmpfs                 382M  692K  381M   1% /run
/dev/mapper/pbs-root  176G  2.0G  165G   2% /
tmpfs                 1.9G     0  1.9G   0% /dev/shm
tmpfs                 5.0M     0  5.0M   0% /run/lock
efivarfs              256K   60K  192K  24% /sys/firmware/efi/efivars
/dev/sda2            1022M   12M 1011M   2% /boot/efi
tmpfs                 382M     0  382M   0% /run/user/0
OK, below looks good!
root@pbs:~# resize2fs /dev/mapper/pbs-root
resize2fs 1.47.0 (5-Feb-2023)
Filesystem at /dev/mapper/pbs-root is mounted on /; on-line resizing required
old_desc_blocks = 23, new_desc_blocks = 25
The filesystem on /dev/mapper/pbs-root is now 51117056 (4k) blocks long.

root@pbs:~# df -h
Filesystem            Size  Used Avail Use% Mounted on
udev                  1.9G     0  1.9G   0% /dev
tmpfs                 382M  692K  381M   1% /run
/dev/mapper/pbs-root  191G  2.0G  180G   2% /
tmpfs                 1.9G     0  1.9G   0% /dev/shm
tmpfs                 5.0M     0  5.0M   0% /run/lock
efivarfs              256K   60K  192K  24% /sys/firmware/efi/efivars
/dev/sda2            1022M   12M 1011M   2% /boot/efi
tmpfs                 382M     0  382M   0% /run/user/0
Great! I just allocated the free space left behind by the installer to my root filesystem. If this is still not enough space, I will continue on to the next section to allocate more space by extending an underlying disk.
Use Space from Extended Physical (or Virtual) Disk
*Using examples from the author *
A. First I might need to increase the size of the disk being presented to the Linux OS. This is most likely done by expanding the virtual disk in KVM/VMWare/Hyper-V or by adjusting my RAID controller / storage system to increase the volume size. You can often do this while Linux is running; without shutting down or restarting.
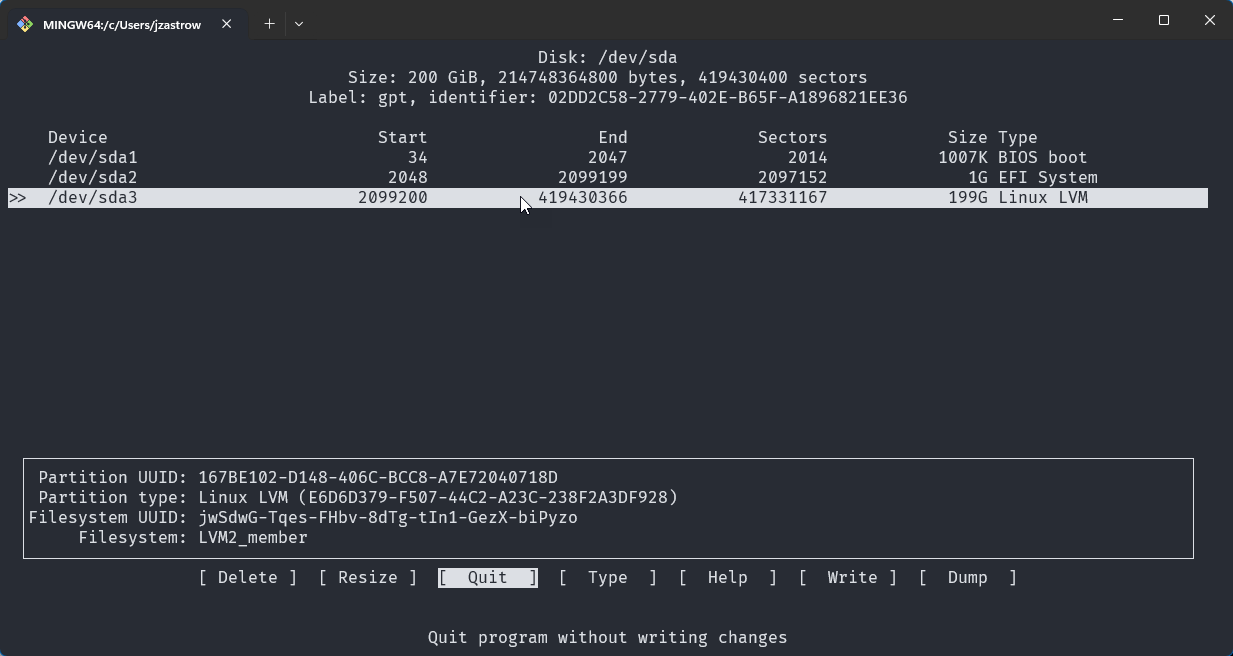
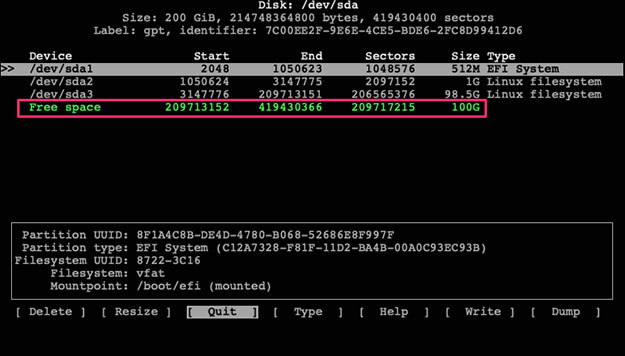
B. Once that is done, I may need to get Linux to rescan the disk for the new free space. Check for free space by running cfdisk and see if there is free space listed, use “q” to exit once I’re done.
If I don’t see free space listed, then I initiate a rescan of /dev/sda with echo 1>/sys/class/block/sda/device/rescan . Once done, rerun cfdisk and I should see the free space listed.
C. Select my /dev/sda3 partition from the list and then select “Resize” from the bottom menu. Hit ENTER and it will prompt me to confirm the new size. Hit ENTER again and I will now see the /dev/sda3 partition with a new larger size.
- Select “Write” from the bottom menu, type yes to confirm, and hit ENTER. Then use “q” to exit the program.
D. Now that the LVM partition backing the /dev/sda3 Physical Volume (PV) has been extended, we need to extend the PV itself. Run pvresize /dev/sda3 to do this and then use pvdisplay to check the new size.
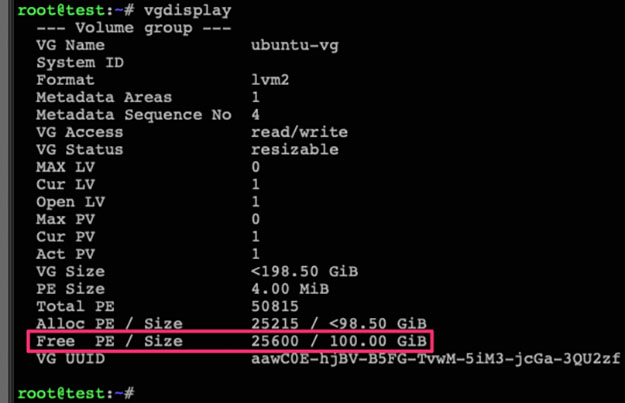
As I can see above, my PV has been increased from 98.5GB to 198.5GB. Now let’s check the Volume Group (VG) free space with vgdisplay.
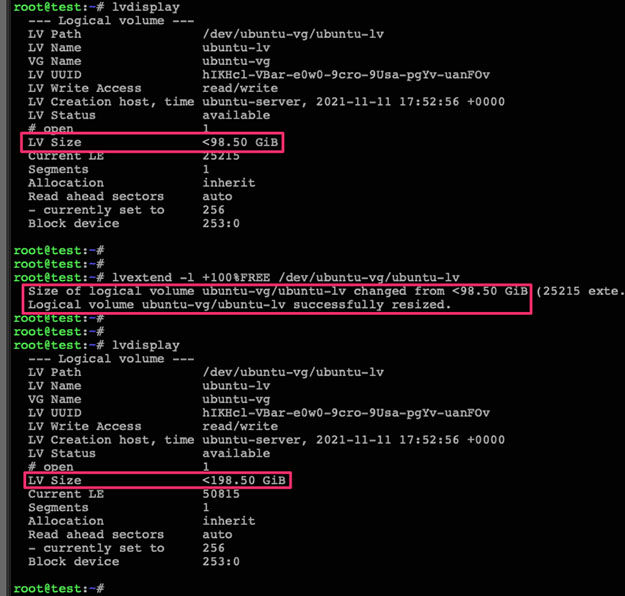
We can see above that the VG has 100GB of free space. Now let’s check the size of our upstream Logical Volume (LV) using lvdisplay.
E. Now we extend the LV to use up all the VG’s free space with lvextend -l +100%FREE /dev/ubuntu-vg/ubuntu-lv, and then check the LV one more time with lvdisplay to make sure it has been extended.
F. At this point, the block volume underpinning our root filesystem has been extended, but the filesystem itself has not been resized to fit that new volume. To do this, run df -h to check the current size of the file system, then run resize2fs /dev/mapper/ubuntu–vg-ubuntu–lv to resize it, and df -h one more time to check the new file system available space.
And there I go. I’ve now taken an expanded physical (or virtual) disk and moved that free space all the way up through the LVM abstraction layers to be used by my (critically full) root file system.
Other useful commands and their output
fdisk -l
Disk /dev/vda: 67 GiB, 71940702208 bytes, 140509184 sectors
Units: sectors of 1 * 512 = 512 bytes
Sector size (logical/physical): 512 bytes / 512 bytes
I/O size (minimum/optimal): 512 bytes / 512 bytes
Disklabel type: gpt
Disk identifier: D1A6933C-7817-4756-AA1B-5D924F3054B0

Device       Start       End   Sectors Size Type
/dev/vda1     2048      4095      2048   1M BIOS boot
/dev/vda2     4096   2101247   2097152   1G Linux filesystem
/dev/vda3  2101248 140509150 138407903  66G Linux filesystem

Disk /dev/mapper/ubuntu--vg-ubuntu--lv: 66 GiB, 70862766080 bytes, 138403840 sectors
Units: sectors of 1 * 512 = 512 bytes
Sector size (logical/physical): 512 bytes / 512 bytes
I/O size (minimum/optimal): 512 bytes / 512 bytes
lsblk
NAME                      MAJ:MIN RM   SIZE RO TYPE MOUNTPOINTS
loop0                       7:0    0   1.9M  1 loop /snap/bottom/759
loop1                       7:1    0     4K  1 loop /snap/bare/5
loop2                       7:2    0   1.9M  1 loop /snap/btop/655
loop3                       7:3    0   9.6M  1 loop /snap/canonical-livepatch/246
loop4                       7:4    0 105.8M  1 loop /snap/core/16202
loop5                       7:5    0  63.9M  1 loop /snap/core20/2105
loop6                       7:6    0  74.1M  1 loop /snap/core22/1033
loop7                       7:7    0 152.1M  1 loop /snap/lxd/26200
loop8                       7:8    0  40.4M  1 loop /snap/snapd/20671
vda                       252:0    0    67G  0 disk
├─vda1                    252:1    0     1M  0 part
├─vda2                    252:2    0     1G  0 part /boot
└─vda3                    252:3    0    66G  0 part
  └─ubuntu--vg-ubuntu--lv 253:0    0    66G  0 lvm  /
Volume and Partition Commands
growpart /dev/sda 3
pvresize /dev/sda3
lvextend -l +100%FREE /dev/pve/root
resize2fs /dev/mapper/pve-root
-
Try also
vgsvgs — Display information about volume groups. Add -v or -vv or -vvv to see more details. Andlvslvs — Display information about logical volumes, also with -v and -vv to see more. -
Note that lvresize can be used for both shrinking and/or extending while lvextend can only be used for extending.
-
There are two separate things:
-
The filesystem, a data structure that provides a way to store distinct named files, and the block device (disk, partition, LVM volume) on inside of which the filesystem lies
-
resize2fsresizes the filesystem, i.e. it modifies the data structures there to make use of new space, or to fit them in a smaller space. It doesn’t affect the size of the underlying device. -
lvresizeresizes an LVM volume, but it doesn’t care at all what lies within it. -
So, to reduce a volume, you have to first reduce the filesystem to a new size (resize2fs), and after that you can resize the volume to the new size (lvresize). Doing it the other way would trash the filesystem when the device was resized.
-
But to increase the size of a volume, you first resize the volume, and then the filesystem. Doing it the other way, you couldn’t make the filesystem larger since there was no new space for it to use (yet).
-
-
resize2fsis for ext filesystems, not partitions.resize2fsshould be used first only when you want to shrink the fs: shrink fs first, shrink the partition/LV second. when enlarging a fs, do the reverse - enlarge partition/LV, enlarge fs. lvresize resizes a logical volume (a virtual disk); resize2fs resizes an ext filesystem. Clearly to increase a filessystem, you need to extend space first; if you want to shrink, the other way around. -
see also
vgchangeandpvmoveas discussed here https://serverfault.com/questions/519172/how-to-change-volumegroup-pe-size
